How to Make 10% SDS Solution (And Why It Keeps Precipitating)
February 12, 2026 · MakeSolution Team
Introduction
If you have ever walked into the lab to find your SDS stock solution full of white crystals, you are not alone. It is the single most common complaint about SDS on every lab forum — ResearchGate, Reddit, Protocol Online — and the fix is simple once you understand why it happens.
This guide covers everything you need to make a reliable 10% SDS stock solution: the recipe, the correct dissolving technique, why precipitation happens (and how to prevent it permanently), and how SDS fits into the broader SDS-PAGE buffer system.
Recipe: 10% (w/v) SDS
| Component | Amount |
|---|---|
| SDS (sodium dodecyl sulfate) | 10 g |
| Deionized water | to 100 mL final volume |
That is it. No pH adjustment, no additional reagents.
Grade matters for gels. Use electrophoresis-grade SDS for SDS-PAGE work. It is tested for dodecanol contamination, which can affect gel resolution. For general lysis buffers, molecular biology grade is fine.
Need exact weights for a different volume? Use MakeSolution's free calculator — type "10% SDS" and any volume you need.
Step-by-Step Protocol
1. Weigh 10 g SDS powder
Weigh in a fume hood. SDS powder is a fine, staticky dust that irritates airways and eyes on contact. Wear a lab coat, nitrile gloves, and safety goggles.
Tip: Tare with the weigh boat already on the balance, then add SDS slowly. The powder tends to puff up and scatter if you dump it all at once.
2. Add ~80 mL deionized water
Use a beaker or Erlenmeyer flask. Add water first, then powder — this reduces foaming compared to adding water on top of dry SDS.
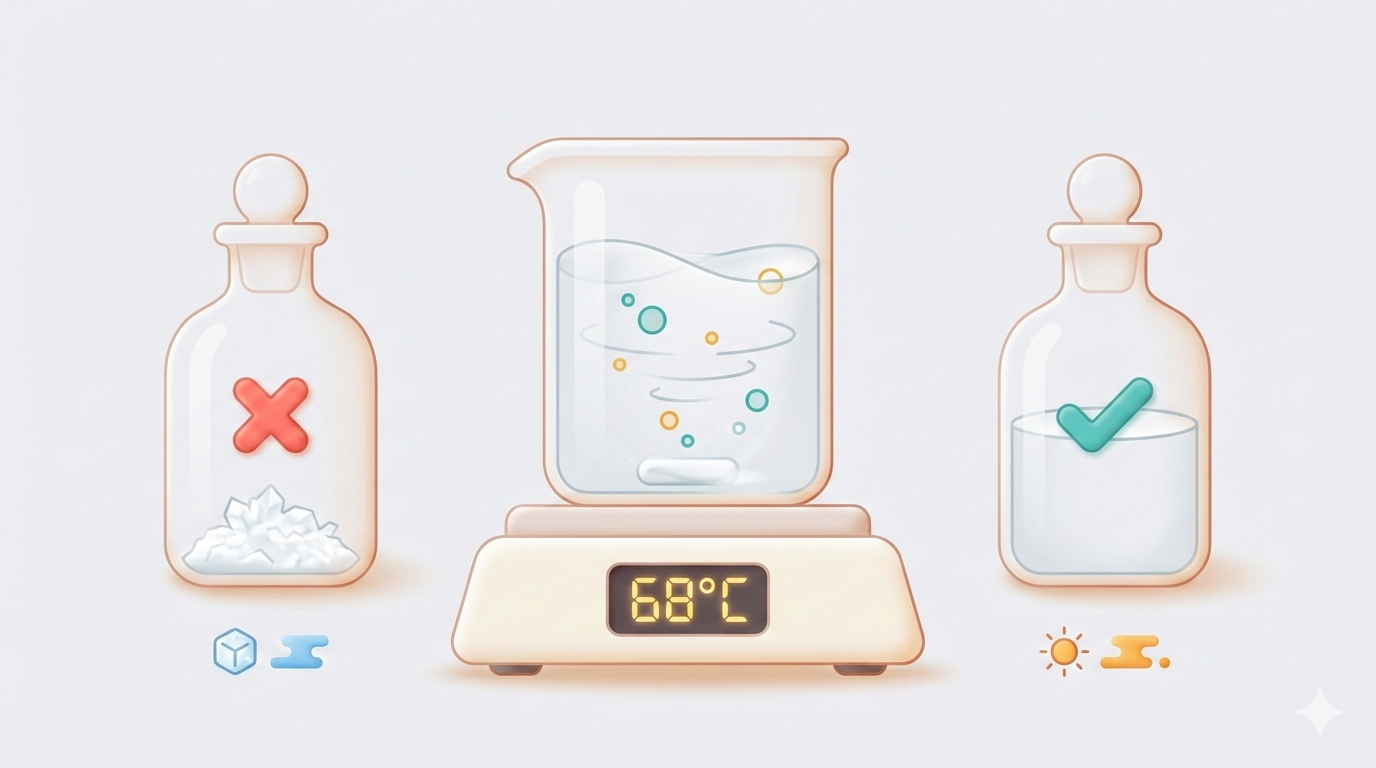
3. Heat to 68 °C with gentle stirring
This is the critical step most protocols gloss over. SDS dissolves poorly at room temperature, and aggressive stirring creates a mountain of foam.
- Set a magnetic stirrer-hotplate to 68 °C
- Use a slow stir speed — just enough for a gentle vortex, no surface splashing
- The solution should clear completely within 5–10 minutes
If you do not have a stirrer-hotplate, use a 68 °C water bath and swirl manually every few minutes.
4. Cool and bring to final volume
Let the solution cool to room temperature, then add deionized water to 100 mL in a graduated cylinder. Pour into a clean storage bottle.
5. Label and store at room temperature
Write the concentration, date, and "DO NOT REFRIGERATE" on the bottle. This label will save your (and your labmates') solution from the #1 cause of SDS problems.
The #1 Problem: "My SDS Precipitated Overnight"
This shows up on ResearchGate at least once a month. You make a perfectly clear SDS solution, leave it on the bench, and come back the next morning to a bottle full of white flakes.
Why it happens: the Krafft point
SDS has a Krafft point of ~16 °C. Below this temperature, SDS cannot form micelles, and its solubility drops dramatically — from freely soluble to barely soluble. The dissolved SDS crashes out as white crystalline needles.
This means:
| Storage location | Temperature | Result |
|---|---|---|
| Lab bench (well-heated) | 20–25 °C | Clear solution ✓ |
| Lab bench (winter, poor heating) | 14–18 °C | May precipitate ✗ |
| Refrigerator | 4 °C | Will precipitate ✗ |
| Cold room | 4 °C | Will precipitate ✗ |
| Freezer | −20 °C | Will precipitate ✗ |
The fix
If precipitation has already happened: reheat to 68 °C with gentle stirring for 10 minutes. The crystals will redissolve completely. This is not degradation — the SDS is chemically fine.
To prevent it permanently:
- Store at room temperature (20–25 °C), away from exterior walls and AC vents
- If your lab runs cold in winter, keep the bottle near a warm instrument or in a drawer — anywhere that stays above 16 °C
- Never put SDS in the fridge or cold room, even "just for a minute"
Can I Autoclave SDS?
No. Never autoclave SDS solutions.
Autoclaving is the most destructive thing you can do to SDS. At 121 °C in the presence of air and moisture, SDS hydrolyzes irreversibly into dodecanol (a fatty alcohol) and sulfuric acid. The result is a cloudy white precipitate that will never redissolve, no matter how much you reheat it.
If you need sterile SDS (rare — most SDS-PAGE work does not require it):
- Filter through a 0.22 µm syringe filter
- Store at room temperature
- Label clearly as sterile
Do Not Adjust the pH
Another common mistake: trying to pH your SDS solution.
There are two reasons not to:
- SDS clogs pH electrodes. It precipitates as potassium dodecyl sulfate (KDS) inside the electrode's KCl reference junction, permanently fouling it. One dip of your pH electrode into SDS solution and you may need a new electrode.
- There is nothing to adjust. 10% SDS in water has a near-neutral pH (~7). It is not a buffer. Just dissolve and use it.
10% vs 20% SDS: Which Should You Make?
| Property | 10% SDS | 20% SDS |
|---|---|---|
| Ease of preparation | Easier to dissolve | Slightly harder |
| Pipetting | Easy | Slightly viscous |
| Storage volume | Larger | More compact |
| Most protocols call for | ✓ | Less common |
| Working concentration after dilution | Same | Same |
Bottom line: Both are just stock solutions that you dilute to the same working concentrations (typically 0.1–2%). If your lab protocol says 10%, make 10%. If storage space is tight and you are comfortable with the math, 20% works just as well.
Where SDS Fits in the SDS-PAGE System
SDS appears in multiple buffers at very different concentrations, and understanding why helps avoid mistakes.
Sample buffer (Laemmli buffer): 1–2% SDS
This is where the heavy denaturation happens. High SDS concentration unfolds proteins and coats them with uniform negative charge so they migrate by size alone.
Typical 2× Laemmli sample buffer:
- 4% SDS (2% at 1× working)
- 125 mM Tris-HCl pH 6.8
- 20% glycerol
- 0.01% bromophenol blue
- Reducing agent (add fresh): 5% β-mercaptoethanol or 50 mM DTT
Running buffer (Tris-Glycine-SDS): 0.1% SDS
The running buffer contains 100× less SDS than sample buffer. Its job is not to denature — that is already done. It just maintains the SDS coating on proteins during electrophoresis.
10× stock: 30 g Tris base + 144 g glycine + 10 g SDS per liter. Dilute to 1× before use.
Critical: Never adjust the pH of running buffer with HCl. The Tris-glycine system self-buffers at the correct pH when dissolved at the right ratios. Adding HCl introduces extra ions that cause blurred bands and slow migration.
Transfer buffer: 0.01–0.1% SDS
For Western blotting, transfer buffer usually contains a small amount of SDS (0.01–0.1%) to help elute large proteins from the gel. Too much SDS prevents binding to the membrane.
SDS in DNA/RNA Extraction: Watch the Precipitation
If you use SDS in lysis buffers for nucleic acid extraction, be aware that SDS will co-precipitate with your DNA/RNA during ethanol precipitation. This contaminates your prep and inhibits downstream enzymes like Taq polymerase.
To prevent this:
- For DNA: Add 0.2 M NaCl before ethanol precipitation — the sodium keeps SDS soluble in 70% ethanol
- For RNA: Use 0.8 M LiCl instead of sodium acetate — lithium salts stay soluble in ethanol
Signs of SDS contamination: low A260/A230 ratio (below 1.8), visible white residue in pellet, PCR failure.
Quick Reference: Do's and Don'ts
| Do ✓ | Don't ✗ |
|---|---|
| Heat to 68 °C to dissolve | Don't stir vigorously (foam) |
| Store at room temperature (20–25 °C) | Don't refrigerate or store in cold room |
| Filter-sterilize if needed (0.22 µm) | Don't autoclave (irreversible hydrolysis) |
| Use electrophoresis grade for gels | Don't dip your pH electrode into SDS |
| Reheat to 68 °C if precipitated | Don't discard precipitated solution |
| Weigh powder in a fume hood | Don't breathe SDS dust |
Summary
Making 10% SDS is one of the simplest recipes in the lab — 10 g in 100 mL of water, heat to 68 °C, done. The only thing that makes it tricky is the Krafft point at ~16 °C: store below that temperature and you get crystals. Keep your bottle at room temperature, never autoclave it, never pH it, and your SDS stock will last for years.
Ready to prepare your solution? Calculate exact amounts for any volume →